Featured Product
This Week in Quality Digest Live
Metrology Features
Master Gage and Tool Co.
Why it matters for accurate measurements
Scott A. Hindle
Part 4 of our series on SPC in the digital era
NIST
Having more pixels could advance everything from biomedical imaging to astronomical observations
Tara Fortier
It will likely change in the next decade
Douglas C. Fair
Part 3 of our series on SPC in a digital era

More Features

Metrology News
New KMR-Mx Series video inspection system to be introduced at the show
Study of intelligent noise reduction in pediatric study
Easy to use, automated measurement collection
High-end microscope camera for life science and industrial applications
Three new models for nondestructive inspection
Machine learning identifies flaws in real time
Advancing additive manufacturing
ABB robot charger automatically detects boreholes, fills them with charges, with no humans present
Two awards annually for students studying precision metrology

More News

Bhaskar Ramakrishnan

Metrology

Quality Inspection for Brake Discs

In-line measuring platform detects micron-level surface defects within 20 seconds

Published: Wednesday, April 13, 2022 - 11:03

To ensure vehicular and pedestrian safety, it’s imperative that brake discs are of superior quality to enable safe braking distances, which is a key metric. Any imperfections on a brake disc can cause safety hazards, heating of the brake assembly, and increased wear and tear. Maintaining tighter tolerances enables superior manufacturing that in turn gets better braking distances, and improved noise, vibration, and harshness (NHV) performance.

Surface defects on brake discs are currently inspected by a combination of manual and associated inspection instruments, which can result in quality escapes. Because brake discs rotate at a particularly high speed, even the smallest geometric errors on these components can lead to vibrations and an adverse NHV profile. The result is lower effectiveness and higher wear, which in turn negatively affect driving safety.

Brake disc inspection often requires several machines

Until now, manufacturers have faced major challenges with the quality inspection of brake discs. “Tactile sensors and 2D cameras are commonly used to inspect the geometry,” says Dave Mendez, general manager and vice president of the ZeroTouch business unit at DWFritz Automation. “However, conventional touch sensors aren’t capable of inspecting both sides of the brake disc at the same time.” Therefore, to accomplish this, two machines are installed, one adjacent to the other.

In addition, the sensors can only randomly inspect the brake discs by following a discrete circular line on the brake disc and checking it for material defects. Hence, there’s a risk of defects being overlooked because the inspection device only checks a limited part of the surface. The same applies to the subsequent inspection using matrix cameras: Since the visual inspection systems only record the surface in two dimensions, a manual, visual inspection by a quality management employee is usually still necessary to determine if the pores, dents, and scratches on the surface are negligible, or if the brake disc must be treated as a defective part.

Operating multiple inspection systems also requires more labor and time. The positional calibration of the machines must be particularly accurate so that the measuring parameters such as brake-disc thickness or parallelism of the same test part is as precise as possible on both systems as well as the underlying reference system. A reference system is the base coordinate system in relation to which the part measurements are made. Key reference features are used as datums across multiple machines, and these enable measurements to be matched up or properly calibrated.

Furthermore, the loading and unloading process often must be carried out manually. Finally, the machines are supplied with touch sensors and 2D or QR code cameras from various manufacturers, which doubles the effort, starting with ordering the equipment and ending with training and regular maintenance.

Noncontact inspection process generates digital twin

DWFritz Automation, a U.S.-based developer and manufacturer of equipment for automated, high-speed noncontact inspection, has adapted its ZeroTouch measurement platform specifically for inspecting brake discs. (Credit: DWFritz Automation)


So, how can the precision of the inspection process be optimized while reducing the time and effort required? DWFritz Automation, a U.S.-based developer and manufacturer of equipment for automated, high-speed noncontact inspection, has adapted its ZeroTouch measurement platform specifically for inspecting brake discs. The system is tuned to analyze all aspects of a brake disc for both electric and internal combustion-based vehicles. These include surface imperfections and complex dimensional measurements.


A high-resolution zoomed image showing a surface defect captured by ZTR. (Credit: DWFritz Automation)

The ZeroTouch Rotational (ZTR) metrology system checks all relevant parameters in a single inspection process and can be integrated directly into the production line with an optimal footprint. All process steps can be automated, including loading and unloading the part into ZeroTouch.

The brake disc is loaded into the system by a pneumatic loader, gantry system, or by a robot, and is positioned on the measurement platform. This platform rotates as multiple sensors scan the brake disc from various sides during the measurement process.

“In order to be able to check the brake discs as precisely as possible for defects, we use up to six strategically positioned noncontact sensors,” says Mendez. “These scan the brake disc and create a 3D model accurate to the micron within just 20 seconds, based on the measurement of millions of data points.”

Industry-proven analysis software then compiles an accurate 3D model of the brake disc based on the measurements from the individual scanners. This is checked in real time for geometric errors or defects on the surface by comparing the test object with a reference model.

During this process, flatness and parallelism, or waviness, are checked, and even deeper damage is reliably detected. The precise measurement process also ensures fewer false alarms as dust particles, for example, are identified to eliminate confusion with superficial defects. If there are excessive differences between the nominal and actual values, the system issues a warning and automatically sorts out the defective part, thus reducing the probability of installing a faulty brake disc to virtually zero.


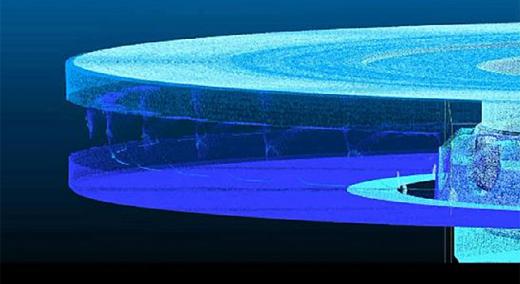
Image depicts a high-density point cloud of a part of the brake disc overlayed by GD&Ts of critical dimensions being measured by the ZeroTouch Rotational Metrology Platform. (Credit: DWFritz Automation)

Space savings through fewer inspection systems

By inspecting all important parameters in a single operation, and with the ability to analyze multiple SKUs with various shapes and sizes, ZeroTouch eliminates the cost of purchasing multiple additional machines. Conventional measurement methods use at least two systems, tactile or otherwise, as well as a system with matrix cameras.

“ZTR offers our customers the best return on investment for in-line production for brake discs, while keeping a small floor footprint and high throughput,” Mendez says. “It’s also well-suited for offline inspection applications, where for heavy parts, ZTR can be outfitted with a pneumatic part loader and unloader.”

The time savings are also noticeable during commissioning, as employees only have to operate and, if necessary, maintain a single system. In case of queries, a competent contact person is available from DWFritz, so there’s no need to contact several manufacturers at the same time and coordinate time-consuming appointments with technicians for potentially more complex machine problems or maintenance tasks.

Another advantage is the lower susceptibility to errors and high repeatability compared to conventional testing methods. Because ZeroTouch scans the test part completely in one measuring process, the brake disc doesn’t have to be repositioned, unlike systems relying on contact sensors. This subsequently results in time savings and a lower risk of error.

“Our objective was to develop a system that can quickly and reliably distinguish incorrect parts from correctly produced parts in a single inspection process, with as little additional effort as possible for the manufacturer,” Mendez says. “We succeeded in doing this with the ZeroTouch Rotational Metrology platform.”

About DWFritz Automation

Established in 1973, DWFritz Automation designs, builds, and supports engineer-to-order automation systems and high-speed, noncontact metrology products, in addition to providing world-class, build-to-print manufacturing capabilities to clients. DWFritz Automation is part of The Sandvik Group of companies.

Discuss

About The Author

Bhaskar Ramakrishnan’s picture

Bhaskar Ramakrishnan

Bhaskar Ramakrishnan began his career as an engineer with GE and has held technology leadership positions at Lexmark, Xerox, and Triquint Semiconductors. He has twelve U.S. patents, three journal publications, and holds a DFLSS Black Belt from Xerox. In his current role as a senior business development manager at DWFritz Metrology, he helps customers solve their inspection needs. Bhaskar received his MSME from the University of Connecticut and an MBA from the University of Kentucky.