PROMISE: Our kitties will never sit on top of content. Please turn off your ad blocker for our site.
puuuuuuurrrrrrrrrrrr
Anil More
Published: Monday, June 13, 2022 - 12:03 Air gauge measuring devices have given highly reliable and precise measurements since the 1940s. As the name suggests, an air plug or air ring gauge is a gauging probe that uses metered air under controlled pressure to sense the back pressure generated as it impinges on the surface of the part under measurement. The controlled air flows through one or more nozzles or jets, and the resulting change in the airflow or pressure is measured by a precise sensing device. This pressure change is compared to the same measurement of a part with precisely known dimensions. The comparative measurement is then converted to an absolute measurement value for the part being measured. To get the maximum benefit of this system of gauging, it’s important to understand air gauges and what factors contribute to their accuracy. Air plug gauges are used for internal gauging, and air ring gauges are for external gauging. Usually, two jets face outward in an air plug gauge, and inward in an air ring gauge. They are symmetrically and precisely positioned on the diameter to balance the air flowing out. The amount of airflow under pressure depends on the particular readout system’s operating pressure and the size of the nozzles/jets. The function of the air plug or air ring body is to guide the part and position the jets on the part’s diameter. The body of the air plug is constructed so it can be inserted into the lowest bore size (i.e., the inside diameter). An air ring gauge is made to fit the maximum diameter of a shaft (outside diameter), as per design tolerance. This varies as per the diameter of the part. The gauge nozzles or jets are recessed into the gauge’s body for two reasons: Additionally, the recessed nozzle ensures that the jet of air has a self-cleaning effect on the gauging surface. All air gauge readouts are pneumatic comparators regardless of the types of air gauging systems. They display a precise value of the part under inspection compared to a master part. They must be referenced or set to a master artifact (i.e., the setting master) of a known calibrated value. The displayed value is the size of the part compared to the master. For example, a master with a known diameter of 0.9996 in. is measured with the air gauge, and the back pressure value is stored. An unknown part is then measured by the air gauge. The difference from that pressure reading compared to the master is determined to represent a value that is 0.0002 in. larger than the master. Thus, the display will show that the unknown part is 0.9998 in. The nozzle, or jet, is the most important element of air gauging. Its size, geometry, and length decide the way the air flows through and out to impinge on the gauging surface. The condition of the jet is important, particularly the exit side inner-diameter corners. These should have no unevenness, burr, or damage because this causes air turbulence and disturbs the laminar flow. The jet hole must be normal (i.e., perpendicular to the tangent) to the gauging surface. Any damage to the jet or its normality will affect the linearity of the reading. The positioning of jets is very important to air gauges’ proper functioning. They must be symmetrical to the body and evenly recessed. The accuracy of gauges’ manufacturing process is key to ensuring their accuracy and repeatability. Symmetry of the jets Symmetry is an important parameter to be controlled during gauge manufacturing. The air flowing out from both jets should create the same back pressure. This means that the centerline of the drilled hole must pass through the exact center of the body of the air plug or air ring. This is a quality function of the manufacturing process and can’t be corrected after production. Balancing the jets The airflow from both jets should be the same. This depends on the size and geometry of the jet bore and how far the jets are recessed; these measurements should be similar for both sides. This can be corrected by carefully deburring the corners of the jets with a super-fine stone shaped at 90 degrees or 60 degrees. This is a skilled job. The bore size of the jet is another important aspect in air gauging. Sizes of jets range from 0.1 mm to 2.5 mm. However, the restriction comes from the type of readout system, system operating pressure, and flow. Every readout system operates on a set system pressure; some are low pressure and some high. Hence, the sensing devices can also vary because different airflows require different jet sizes. We can’t put small jets on high pressure/flow air gauges, or big jets on low pressure/flow gauges. Some systems can use multiple jet sizes, depending on their operational capabilities. But it’s important to note that every time the jet size changes, adjustments in the readout system are required to ensure proper magnification and linearity. Air gauging is an accurate and reliable method of measuring, with resolution and repeatability to the millionths of an inch. It also requires no special operator skills. However, accuracy depends on the gauge manufacturing process. Any lack of symmetry, alignment, or air balance can drastically affect an air gauge’s accuracy. Quality Digest does not charge readers for its content. We believe that industry news is important for you to do your job, and Quality Digest supports businesses of all types. However, someone has to pay for this content. And that’s where advertising comes in. Most people consider ads a nuisance, but they do serve a useful function besides allowing media companies to stay afloat. They keep you aware of new products and services relevant to your industry. All ads in Quality Digest apply directly to products and services that most of our readers need. You won’t see automobile or health supplement ads. So please consider turning off your ad blocker for our site. Thanks, Anil More has 50 years of experience and knowledge in engineering metrology. He started his metrology journey with thread gauges at Horstmann India, and then with dial, air, and electronic gauges at Baker Mercer India. He is an ISO QMS-certified lead auditor who has worked in many industries big and small, traveled a lot, met many people, and seen many companies. Today he consults in the field of dimensional gauging, particularly in air gauging.Air Gauging Overview
After 80 years, this measurement method is still as precise and easy as ever
Diagram of air plug gauge. Image courtesy Mahr.
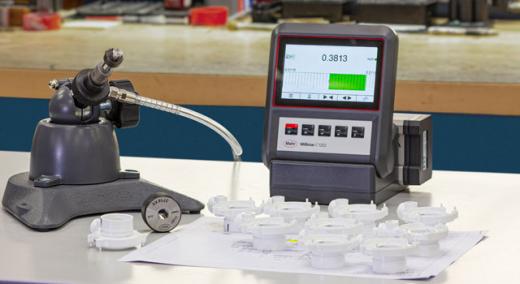
Air gauging is a fast and precise gauging solution for smart manufacturing. Image courtesy Mahr.The body
1. To provide protection so that during insertion the nozzles don’t touch the part under test and get damaged.
2. To direct and create a column of air that impinges onto the part surface normal to its curve. The more precise the positioning of the nozzle to the part’s curve, the more laminar the airflow, which ultimately decides the linearity of the indication.The nozzle
Conclusion
Our PROMISE: Quality Digest only displays static ads that never overlay or cover up content. They never get in your way. They are there for you to read, or not.
Quality Digest Discuss
About The Author
Anil More
© 2023 Quality Digest. Copyright on content held by Quality Digest or by individual authors. Contact Quality Digest for reprint information.
“Quality Digest" is a trademark owned by Quality Circle Institute, Inc.