{domain:"www.qualitydigest.com",server:"169.47.211.87"} Skip to main content

        
User account menu
Main navigation
  • Topics
    • Customer Care
    • Regulated Industries
    • Research & Tech
    • Quality Improvement Tools
    • People Management
    • Metrology
    • Manufacturing
    • Roadshow
    • QMS & Standards
    • Statistical Methods
    • Resource Management
  • Videos/Webinars
    • All videos
    • Product Demos
    • Webinars
  • Advertise
    • Advertise
    • Submit B2B Press Release
    • Write for us
  • Metrology Hub
  • Training
  • Subscribe
  • Log in
Mobile Menu
  • Home
  • Topics
    • Customer Care
    • Regulated Industries
    • Research & Tech
    • Quality Improvement Tools
    • People Management
    • Metrology
    • Manufacturing
    • Roadshow
    • QMS & Standards
    • Statistical Methods
    • Supply Chain
    • Resource Management
  • Login / Subscribe
  • More...
    • All Features
    • All News
    • All Videos
    • Training

How to Prevent Actuator Failure in Continuous-Duty Industrial Applications

7 ways to keep your actuators alive

Raco

Janine Kyle
Bio
Thu, 07/16/2026 - 12:03
  • Comment
  • RSS

Social Sharing block

  • Print
Body

Businesses running equipment that depends on actuators, especially in high-cycle or nonstop operations, already know this: It’s common for actuators to fail without showing any warning signs.

ADVERTISEMENT

All of a sudden, the production line stops midshift. It’s not until hours later that you find out that the compact actuator caused the problem.

Issues like this don’t happen in a snap. They’ve been a long time in the making. And many of them are preventable. 

A bigger problem than the industry talks about

Unplanned downtime due to equipment failures costs manufacturers in the U.S. an estimated $50 billion per year. Of that amount, motion-control equipment components like actuators account for a large portion.

The compact actuator is prone to unplanned failures because it’s usually crammed into a tight space, constantly under thermal stress, and rarely checked unless something goes wrong. In continuous-duty applications, where the actuator runs at or near full load without rest, the margin for error becomes even smaller.

Five reasons why compact actuators fail in continuous-duty use

Before you can prevent the problem, you need to know what’s actually causing it. Here are the most common culprits.

1. Thermal overload

Actuators create heat during their operation. In continuous-duty cycle operations, there’s no opportunity to dissipate the generated heat. Excessive internal heat can lead to the breakdown of the motor windings or the electronics controlling it. This situation isn’t always immediately apparent, but may reduce the lifespan of the actuators over time.

2. Incorrect duty-cycle rating

Many of the issues with linear actuators come from a single common mistake: incorrectly rated duty cycle. Duty cycle is the interval of time between operations and the subsequent idle period. Operating an actuator without the proper duty cycle will lead to a breakdown after many hours of usage.

3. Lack of lubrication

Most actuators are equipped with lead screws, ball screws, or gears that require adequate lubrication to operate correctly. High-cycle operation will significantly decrease the degradation time of the lubricant. Without enough lubrication, the parts will experience metal-to-metal friction, resulting in increased wear and tear.

4. Misalignment/side loading

Compact actuators are usually rated to withstand axial loading forces. Misaligned mounting or introducing any load other than axial can lead to premature failure of internal components.

5. Fluctuations in voltage and current

Electrical interference, surges in voltage, or unstable sources of power will cause deterioration of motor components. Continuous operation causes more harm compared to intermittent use.


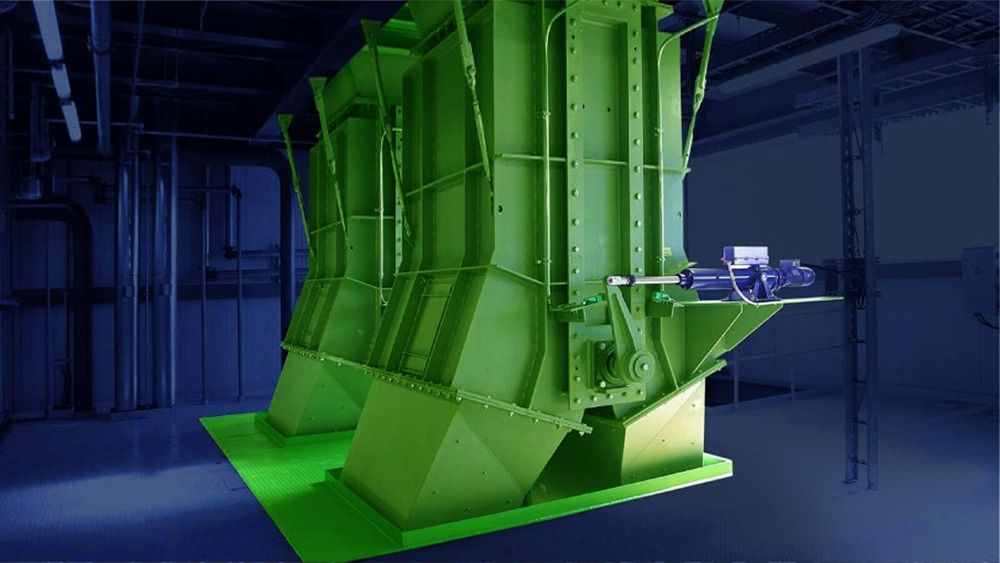
This is a RACO T-style actuator with a right-angle gearbox with motor. In this application, the actuators are used to deflect excess bulk material as the conveyor system (hopper) is being loaded.

Ways to prevent actuator failure

There are several things you can do to keep your actuator from causing unnecessary downtime, and none of them requires a new program or a big budget. Most of it starts with checking things you probably already have access to.

1. Choose the actuator based on the duty cycle of the load

Don’t rely on assumptions. Check the actual run-time data and compare that with the manufacturer’s specifications. You’ll find that there are S1 to S10 duty cycles, as per IEC 60034-1, an international standard for rotating electrical machines.

S1 indicates that the actuator is a continuous duty motor able to operate continuously at a steady load without exceeding any thermal limits. In cases where there are periodic cycles between running and rest periods of an actuator, you may go for S3 or S4.

2. Adjust capacity based on temperature

In most cases, manufacturers use 25°C for load ratings. If your actuator is in an enclosed environment, or your environment is relatively warmer than that, then the capacity must be reduced accordingly. 1–2% percent of capacity per degree centigrade is typical. The actual de-rating curve can be found in the product data sheet; if not, consult the application engineering department of the supplier.

3. Make lubrication part of your preventive maintenance program

For ball-screw actuators used in high-cycle applications, most manufacturers recommend lubricating every 500–1,000 hours, or even more often. Don’t assume that the lubrication that comes with the actuator will be adequate throughout the device’s entire working life. Follow the recommendations of the actuator manufacturer regarding the lubricant type to use.

Some actuators come with manufacturer instructions for lubrication that must be adhered to. These guidelines are definitely worth keeping handy.

4. Check alignment at first use and after 500 hours

Side-loading issues can occur at installation due to mounting plates that aren’t perfectly perpendicular or improperly aligned load attachments. Use a dial indicator to ensure proper actuator alignment during installation. Verify it again after 500 hours of use, because the mounting might have shifted position during operation.

5. Install thermal sensors where applicable

If you don’t have temperature sensors on your actuators, add them. Thermistors and resistance temperature detectors (RTDs) mounted near the motor winding can detect thermal issues before they cause a failure. Set the alarm to trigger when the temperature reaches between 80–85% of the actuator’s maximum temperature rating. This gives you time to investigate without shutting down unexpectedly.

Most Beckhoff and Parker Hannifin actuators come with this feature. If not, a simple clamp-on thermocouple sensor will cost you little and take about half a day to install.

6. Reduce electromagnetic interference

Install filters or surge protectors for the power sources to your actuator drivers. For servo motors, verify whether your actuators require the input voltage to match the line voltage. Sagging voltage under high-load conditions is one of the reasons your actuators fail.

7. Log and monitor performance data

Many industrial controllers can log actuator current consumption, the number of cycles performed, and operating temperatures. If yours has this capability, use the data. Any incremental rise in current consumption over time indicates internal wear long before any visible indications arise. This allows for planned replacements.

Spec it right, keep it running

Compact actuator failure in continuous-duty applications almost always comes down to a mismatch, either between the actuator’s rating and the actual application, or between maintenance practices and operating demands.

Fix the spec, manage the heat, keep it lubricated, and watch the data. You’ll spend a lot less time doing emergency repairs.

Add new comment

The content of this field is kept private and will not be shown publicly.
About text formats
Image CAPTCHA
Enter the characters shown in the image.

© 2026 Quality Digest. Copyright on content held by Quality Digest or by individual authors. Contact Quality Digest for reprint information.
“Quality Digest" is a trademark owned by Quality Circle Institute Inc.

footer
  • Home
  • Print QD: 1995-2008
  • Print QD: 2008-2009
  • Videos
  • Privacy Policy
  • Write for us
footer second menu
  • Subscribe to Quality Digest
  • About Us