Peter Schulz  |  01/29/2009

Profile Projectors Keep Pace With the Digital Age

The saga of improved productivity continues for this versatile measurement system.


The idea of mixing optics and measurement has its origins hundreds of years ago in the realm of pure science, i.e., astronomy (telescopy) and microscopy. Manufacturing first adopted optics for routine inspection and measurement of machined and molded parts in the 1920s with James Hartness’ development of instruments capable of projecting the magnified silhouette of a workpiece onto a ground glass screen. Hartness, as longtime chairman of the United States’ National Screw-Thread Commission, applied his pet interest in optics to the problem of screw-thread inspection. For many years, the Hartness Screw-Thread Comparator was a profitable product for the Jones and Lamson Machine Company, of which Hartness was president.

Horizontal vs. vertical instrument configurations


Profile projectors are available in two basic configurations: “horizontal,” where the line of sight of the optical system is horizontal and parallel to the floor, and “vertical,” where the optics looks vertically downward from a position above the workpiece.

Although either system can effectively image most types of work, the horizontal design is better suited for heavier workpieces that require clamping or fixturing. Vertical systems are ideal for use when the workpiece--generally lighter pieces such as thin stampings, flexible or molded parts or similar items--can simply be laid down upon the stage.


It is interesting that for such a well-established technology (or perhaps precisely because of the length of time it has been in existence) the profile projector goes by any number of monikers, including optical comparator, projection comparator, contour projector, shadow projector, profile projector, and probably a number more.

Scrappy survivor

The demise of the profile projector has long been predicted, with the expectation that the instrument would be supplanted by various types of vision systems. However, reports of this instrument’s obsolescence are obviously premature. For many parts with complex profiles, such as screw threads, gear teeth, nozzles, fuel injectors, and other precision hydropneumatic and electromechanical components, there are numerous benefits in the capability and design of a profile projector that make the instrument the ideal choice for many quality inspection applications .

Quick set-up

If the critical features of a workpiece can be projected in silhouette, and if the number of units to be inspected is relatively low, then a profile projector has potential as an ideal measurement application. With little or no programming required, profile projectors are quick to set up and provide almost instant results. Accordingly, many manufacturing processing schemes coordinate the use of both profile projectors and vision systems, using the former for low volumes and the latter for applications that run to higher numbers (thus justifying the programming time required by vision system automation).

Easy to learn and operate

Learning to operate a profile projector is generally easier than training on the typical vision system. “To begin with, using a profile projector is extremely intuitive,” says Walter Wardzala, precision measuring instruments product manager for Mitutoyo. “When you see a part’s magnified shadow on the screen, you’ve got a direct connection to the workpiece--it’s obvious you are observing the actual part as opposed to the synthetic, processed images delivered by vision systems. Also, the display is very easy to see. The viewer stands upright in an ergonomic position parallel to the screen, which is large enough for a number of people to view at the same time, facilitating collaboration on measurement--and also making training that much easier.”

Easy maintenance, limited wear

The relative simplicity of profile projectors makes them inherently reliable and well suited for use on the factory floor in a manufacturing cell environment, even when positioned right next to the machine tool. “A projector’s design makes it robust and easy to service,” Wardzala observes. If a light source burns out, replacing it is a routine matter; compare that to dealing with a vision system when the camera goes out. Also, a profile projector’s high load capacity and simple construction make it less liable to be damaged by workpieces dropped on the stage. Consider what could happen when a sixty-pound part is accidentally dropped on the stage of a vision machine--ouch! While both types of machines would probably incur damage to some extent, the dollar value of the damage would likely be much greater on a vision system. ”

Cost-effective

Another factor in the continuing popularity of profile projectors is the relatively low initial acquisition cost compared to vision systems of equivalent load capacity. A typical profile projector with a maximum load capacity of 100 pounds will retail for around $5,000, while a basic vision system with a similar capacity would run three to four times that amount.

For the aforementioned reasons, as well as the popularity that comes with familiarity, the profile projector is as common in machine shops and on factory floors now as it ever has been. Confident of a future demand for this instrument, profile projector manufacturers continue to engineer refinements and upgrades into newer and better versions of this machine .

Today’s profile projector: refined performance

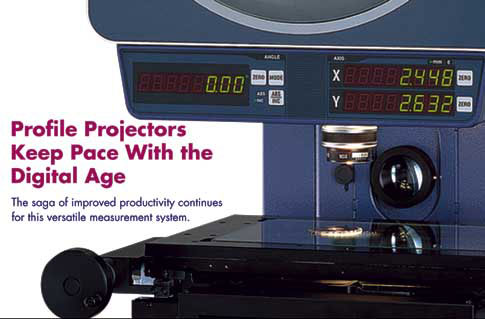
Although the basic functionality of profile projectors has changed very little, current top-of-the-line profile projector offerings have benefited from decades of engineering development and improvement. “Today’s profile projectors can be equipped with motorized stages, optical sensors enabling automatic edge detection, extremely high resolution, and digital readouts,” Wardzala explains. Mitutoyo’s own PH-3515F is an example.

With a resolution of 0.0001 in./0.00005 in. (0.001 mm/0.005 mm) and a magnification accuracy of ± 0.1 percent under contour illumination (± 0.15% under surface illumination), profile projectors such as the PH-3515F combine accuracy, a floating work stage and a maximum workpiece load of 100 pounds (45 kg), making these types of profile projectors ideal for both production floor and laboratory applications.

Hartness would have marveled at the ergonomic design of today’s projectors, with their bright, crisp images, presented with cross hairs and staggered reference lines. Most profile projectors offer linear scales, digital angle measurement and optics capable of displaying angled workpiece images free from blurring or distortion, making them the ideal tool for thread-pitch measurement and similar inspections. Unlike your grandpa’s profile projector (he might have called it a “shadowgraph”) almost all of today’s profile projectors can be optionally equipped with high-performance, two-axis counters with advanced linear functions and optical edge detection. To aid in measurement, most are compatible with a wide range of versatile reading scales and overlay charts, as well as holders and vises.

However, even the level of refinement represented by the latest category offerings does not mean that the height of profile projector performance has yet been reached. The next evolutionary phase is expansion of the profile projector’s capability via the addition of external control interface data boxes that give projectors coordinate measuring machine CMM capabilities, albeit on two axes.

External control interfaces add powerful measuring capabilities and ease-of-use to any compatible profile projector. The ability to select the amount of automation (user intervention), simple displays, and meaningful prompts at every stage in the measurement process aids the operator at every step. Difficult and repetitive measurement tasks are streamlined. The control interface’s iconic cues help the operator achieve complete and consistent data collection with minimal operator subjectivity. The end result is faster measurement and reduced error for a significant boost in profile projector productivity and cost savings.

To connect this type of unit, all that’s required is a compatible data output, usually from the projector’s linear scales. The basics of automated operation involve automatic identification of workpiece features based on the relationship of captured points entered by the operator (utilizing the profile projector’s standard cross hairs and trigger). As sufficient points are entered, the display highlights an icon representing the type of feature the system identified (e.g. circle, ellipse, rectangle, rounded slot, etc.) automatically and without user intervention. The measurement can be completed as soon as the icon matches the feature being measured. This function enables successive measurement of different types of features without the need to press a key to preselect each one--or even to take eyes off the part--thus speeding up throughput. Another advantage of this function is the ability to use multiple points to increase measurement accuracy. For example, although only three points need be captured to recognize a hole, as many as 100 may be entered if a high-precision roundness factor calculation is required.

Wardzala likens a profile projector equipped with this type of device to a 2-D CMM. “In my experience, the typical person being trained in the use of a profile projector will come from a quality or production background--these generally are folks not overly familiar with larger types of metrology equipment,” he explains. “But recently I was training a customer’s CMM operators in the use of our QM-Data200 box, and they picked up on it immediately. They said that the QM stores data points the same way a CMM does. Their feeling was that this actually makes the profile projector into a 2-D CMM. Interestingly, Mitutoyo actually did adapt its 3-D CMM programs for use with the QM-Data.”

As a result of its CMM “DNA,” the unit includes functions for intersections and constructions, geometric tolerancing, and a data-cloud function that improves the presentation of data with graphic displays of the features being measured.

Another strong attribute of external interface boxes is their ability to enable the profile projector to easily analyze and communicate measurements. Results can be printed, and network connectivity makes it a simple matter to transfer results for further analysis or for incorporation into enterprisewide quality schemes.

A lasting technology

Whether they are referred to as optical comparators or profile projectors, these instruments, with their arrangements of precision lenses, mirrors, and screens, have a long history and a strong presence in many of today’s manufacturing inspection applications. With current developments in inspection technology, the capabilities of these tried-and-true machines can be expanded and improved to ensure their value well into the 21st century.

Discuss

About The Author

Peter Schulz’s picture

Peter Schulz

Peter Schulz is the proprietor of Schulz Advanced Arts. For more than two decades, Schulz has consulted with leading industrial and technology companies on the execution of their marketing communications programs. He is also a frequent contributor to industrial trade journals.