Featured Product
This Week in Quality Digest Live
Metrology Features
Tara Fortier
It will likely change in the next decade
Douglas C. Fair
Part 3 of our series on SPC in a digital era
Chris Anderson
How this technology drives transformational change
Eric Whitley
Manufacturing methods and technologies that improve waste management
Silke von Gemmingen
Simple AI integration and short training phases are key elements

More Features

Metrology News
Easy to use, automated measurement collection
High-end microscope camera for life science and industrial applications
Three new models for nondestructive inspection
Machine learning identifies flaws in real time
Advancing additive manufacturing
ABB robot charger automatically detects boreholes, fills them with charges, with no humans present
Two awards annually for students studying precision metrology
Includes checkups to help reduce the risk of failure, optimize production, keep equipment operating
Enabling scientists to better monitor and analyze changes in space-replicating habitat

More News

Delcam

Delcam’s default image

Metrology

Product News: Delcam Launches New PowerINSPECT Inspection Software

New version includes an interface for undertaking simple measurements.

Published: Tuesday, June 16, 2009 - 13:05

(Delcam: Salt Lake City) -- Delcam has launched a new version of its PowerINSPECT inspection software for checking the dimensions of parts, prototypes, and tooling against CAD data. The new version includes a range of enhancements to make the software easier and more flexible to use.

The most obvious change in the new version is a completely new interface for undertaking "simple” measurements. This will make it much easier to undertake basic tasks, such as measuring the distance between two points or two planes, or the centers of two circles, or checking the thickness of a section.

It has also been made easier to add or delete points during an inspection from a set of measurements defining any feature. Points might need to be added to collect extra data from a suspect area, while "rogue” measurements can be deleted to prevent them affecting the overall inspection result.

A number of improvements have been made to the ways in which PowerINSPECT can use data within geometric features. The attributes of each point making up the sequence will be able to be displayed separately, either as the renowned PowerINSPECT dots or as needles proportionate in length to the extent of the deviation. This will make it easier to see where the problems areas are, especially in bigger parts with large numbers of measurements.

It will also be possible to use individual points within more than one feature. For example, two sets of points could be used to check the circles at the top and bottom of a cylinder, and then combined to produce the inspection report for the cylinder itself.

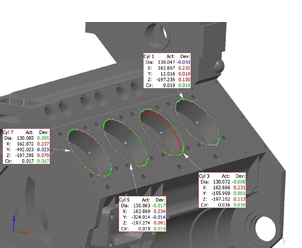
Increased flexibility will also come from the new ability to display feature measurements within PowerINSPECT as surface points for comparison with the CAD model. This will make it easier to spot errors when, for example, a circle is perfect in its own dimensions but is not in exactly the correct position on the part.

One simple enhancement that could save considerable time is the ability to halt an inspection during the measurement process. This will allow the operator to produce a report as soon as the part is found to be out of tolerance rather than having to complete the full sequence of measurements. It will be particularly helpful when inspecting a long series of more complex components in a production environment.

PowerINSPECT’s easy-to-understand reporting has always been one of its most popular attributes. This has been further improved with the ability to display an image of the part on each page of the report showing just the measurements listed on that page. This will make it easier to analyse the results from large sets of data, e.g., results collected with laser scanners.

Discuss

About The Author

Delcam’s default image

Delcam