PROMISE: Our kitties will never sit on top of content. Please turn off your ad blocker for our site.
puuuuuuurrrrrrrrrrrr
NIST
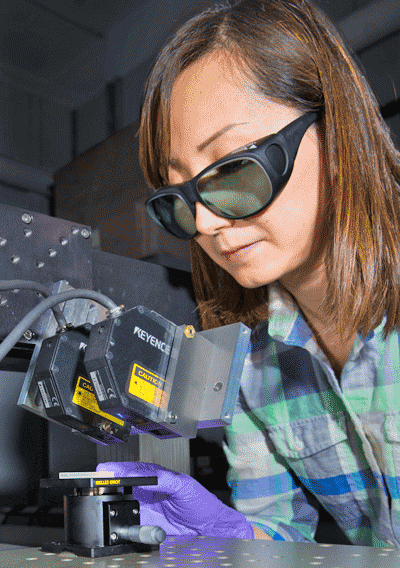
Published: Tuesday, February 16, 2016 - 12:26 Let’s say you’re a biotechnologist working to develop new medicines or a better test for forensic analysis. You might find yourself frequently using absorbance spectroscopy, a technique that allows researchers to identify even small amounts of a substance (such as DNA) or an antibody based on how it absorbs light. To support these kinds of day-to-day measurements by people in the biotechnology community, NIST’s Material Measurement Laboratory (MML) recently developed a new standard reference material (SRM) designed for use with samples where only a small amount of the material is available. The new NIST resource, called SRM 2082, consists of two separate solutions, one of tryptophan, an amino acid, and one of uracil, a nucleic acid found in RNA. But before MML staff could release its SRM to a waiting biotechnology community, they required an ultra-accurate determination of the width of the NIST cuvettes, which are tiny containers used in the certification process. The width of the cuvettes determines the pathlength that light travels through these solutions. (The certified property of SRM 2082 is an equation that relates the pathlength of light through these solutions to their absorbance.) To do so, they called on a team of dimensional metrologists from NIST’s Physical Measurement Laboratory (PML). Nominally, each miniature cuvette is 45 mm long by 10 mm wide—smaller than a typical thumb drive—with three different possible pathlengths: 2 mm, 1 mm, and 0.5 mm. However, “due to geometric imperfections, this gap between the walls of the cuvette varies slightly as a function of location,” says PML Engineering Physics Division’s Wei Ren. “To reduce uncertainties in the measurements of these standards, MML needed to have a rigorous characterization of the dimensions of the gap for each cuvette.” The gold standard for this type of measurement is a high-accuracy coordinate measuring machine (CMM), whose hard probe tip physically touches the surface of an object to assess its dimensions, Wei explains. But in this case, alas, a CMM was out of the question. The big challenge, Wei explains, was the large length-to-width ratio of the cuvettes. Although she had probe tips of the correct size, the smaller tips required shorter shafts to maintain proper stiffness, and those shafts were too stubby to reach the bottoms of the containers. Wei considered other options. She often used laser triangulation probing, a noncontact technique, to measure the dimensions of ceramic or other opaque surfaces. The method involves shining a fat laser spot onto the surface of an object and collecting the incident light through a lens, which then focuses it onto a charge-coupled device (CCD). The position of the beam spot on the CCD varies with the distance to the object at that measurement point, as seen in the diagram below. Though she had never used the method with transparent glass, Wei found a workaround: Instead of shining laser light straight down onto the cuvette, she shone it at a 20° angle. At each of the four interfaces between air and glass, the light was reflected back to the CCD detector. With this information, a computer program was able to work out the distances between each of the interfaces—in particular, between the two glass inner walls that determine each cuvette’s “gap.” Wei used laser triangulation to probe the gap of each cuvette at 6-mm intervals. Because these were not absolute measurements, she backed up her findings by comparing at least part of each cuvette to measurements made with a standard touch probe, the NIST M48 CMM. Her measurements yielded uncertainties of less than 1 micrometer (millionth of a meter). With this information, the MML team’s resulting expanded uncertainty of the absorbance of the materials, as a function of pathlength, is less than 0.08 percent. “We spent a lot of time unsuccessfully trying to come up with a ‘complete probing’ solution for this small, high-aspect ratio measurement,” says Eric Stanfield, Measurement Services project leader in PML’s Dimensional Metrology Group. “Just when we thought we were out of options, Wei delivered success for the team by coming up with this alternative approach that combined probing and a noncontact technique that worked remarkably well.” “Measurement challenges are what make dimensional metrology so exciting and the ability to find creative solutions is almost a prerequisite for the job,” says Stanfield. The new SRM 2082 is expected to be released by April 2016. Quality Digest does not charge readers for its content. We believe that industry news is important for you to do your job, and Quality Digest supports businesses of all types. However, someone has to pay for this content. And that’s where advertising comes in. Most people consider ads a nuisance, but they do serve a useful function besides allowing media companies to stay afloat. They keep you aware of new products and services relevant to your industry. All ads in Quality Digest apply directly to products and services that most of our readers need. You won’t see automobile or health supplement ads. So please consider turning off your ad blocker for our site. Thanks, Founded in 1901, the National Institute of Standards and Technology (NIST) is a nonregulatory federal agency within the U.S. Department of Commerce. Headquartered in Gaithersburg, Maryland, NIST’s mission is to promote U.S. innovation and industrial competitiveness by advancing measurement science, standards, and technology in ways that enhance economic security and improve our quality of life.Thinking Outside the Cuvette
To measure the dimensions of the skinny glass container, NIST’s PML scientists get creative
Wei Ren with the triangulation probe and a cuvette. J.L. Lee/PML
A diagram with a basic illustration of laser triangulation probing. The laser was angled for the cuvette measurement setup. Original diagram licensing information: “Laserprofilometer EN” by Georg Wiora (Dr. Schorsch). Self-made drawing. Licensed under CC BY-SA 3.0 via Commons. Changes to original diagram by J. L. Lee/PML.
A cuvette with a 2-mm gap length, illuminated with a laser spot (red) from the triangulation probe. J.L. Lee/PML
Our PROMISE: Quality Digest only displays static ads that never overlay or cover up content. They never get in your way. They are there for you to read, or not.
Quality Digest Discuss
About The Author
NIST
© 2022 Quality Digest. Copyright on content held by Quality Digest or by individual authors. Contact Quality Digest for reprint information.
“Quality Digest" is a trademark owned by Quality Circle Institute, Inc.