by Tad A. Davis The old adage "seeing is believing"
is appropriate when referring to optical comparators. Because these measurement tools display a magnified image of a part, a tremendous amount of information about that part can be gathered in a
short time simply by looking at the image. Optical comparators, for those unfamiliar with them, are inspection machines that project magnified images of parts onto a glass screen using
illumination sources, lenses and mirrors for the primary purpose of making 2-D measurements. Dating back as far as calipers and micrometers, optical comparators have been used for more
than 50 years and remain a versatile and cost-effective technology for monitoring the processes and quality of a broad range of manufactured parts. Originating from static overhead projectors
that displayed magnified images of screw threads onto a wall for manual measurement, optical comparators have evolved into full-featured machines that use modern mechanical, electrical and
optical technology to minimize inspection time and maximize cost savings. Comparator advantages Optical comparators
can provide more information than just simple dimensions. Length and width measurements of the part shown above, for example, can be quickly obtained from two separate measurements by using a
micrometer. These superficial measurements, however, might not reveal burrs, scratches, indentations or undesirable chamfers. Such imperfections are best detected on a comparator. In addition, a
comparator's screen can be simultaneously viewed by more than one person and provide a medium for discussion, just as a white board might facilitate a conference. Another advantage of
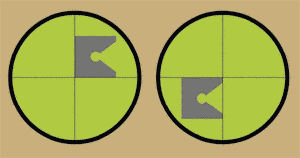
comparators is their ability to measure in 2-D space. Unlike micrometers and calipers, which measure one dimension at a time, comparators measure length and width simultaneously. To do this, the
operator lines up the lower left-hand corner of the image with the screen centerline to establish a zero point, as illustrated above, and then checks the upper right-hand corner to get a
simultaneous reading of both length and width. The straight-line distance from corner to corner can be obtained with a single keystroke.
Measuring Length and Width

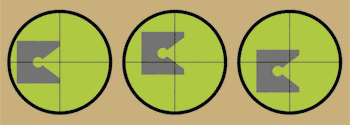
In addition, constructed points, gage points or gage lines that appear on part drawings can be established quickly on optical comparators, making relative measurements from
these "points in space" easy to perform. This technique is illustrated below. The right side of the part is aligned with the vertical centerline, and a zero position is set. The part
is moved to the right by the nominal depth given on the drawing. A diameter is then measured at this depth by moving the part vertically and measuring points on each angled surface. "Points in Space" Measurement
 Optical comparators are among the easiest measurement instruments to use. In less
than two hours, users with only a minimal amount of gaging experience can make accurate measurements using these devices. Because a comparator displays a part's
2-D image on-screen, the image can be easily associated with the part's 2-D CAD drawing. This simplifies the process of developing measurement procedures for parts
from drawings and minimizes the subjectivity of more complex measuring methods. For example, using a sine plate and a height gage to measure an angle might require a
detailed procedure, whereas the same measurement on a comparator might not require a written procedure at all.
Optical comparators are noncontact gages, another key advantage. Nothing but light touches a part during measurement, which means that delicate parts won't change
shape from any direct forces during the process. Noncontact gages also eliminate the "feel factor" and resulting human error of hand gages. Contact measuring methods
such as micrometers or plug gages are subject to the amount of pressure applied during measurement, particularly a problem on more delicate parts. Also, the size and location
of certain dimensions might preclude the use of contact inspection tools. A tiny radius of 0.010 in., for example, would be difficult to measure with a contact gage. When
magnified on a comparator with a 100X lens, however, this radius would be 1 in. on-screen--and easily measured with a radius chart.
Cost savings Optical comparators save time. Ease-of-use factors and ergonomic designs reduce the
inspection time, retraining costs and operator fatigue, all while increasing throughput. And because comparators generally allow parts to be held in one orientation for each
2-D view, costs associated with parts handling and setup times are significantly reduced. Custom hard gages are subject to wear and need frequent recertification, which takes
them out of service. Additionally, high-volume production can require multiple sets of fixed gages, increasing costs further. The inflexibility of these fixed gages means that
minor product-design changes can render hard gages obsolete or require costly modifications. Optical comparators, on the other hand, are general-purpose
measurement devices, easily adaptable to design changes and appropriate for either first-article or repetitious inspections.
Dimensioning techniques designed to give more leeway to parts in relation to their true functional purpose, such as profile tolerancing and true-position tolerancing with
bonuses, reduce the reject rate of good parts that might have passed had their tolerances been assigned differently. For example, an arc by itself might be out of
specification, whereas that same arc combined with other features as part of a profile tolerance might pass. The optical comparator is ideal for such dimensioning. Types of measurements  Measurement by comparison. At first, the only way to measure with an optical comparator was by comparison--hence its name. Part images could be compared to
rulers and protractors placed across the screen. For example, a measurement of 1/32 in. on-screen equates to 0.001 in. on the part when using a 31.25X lens.
Eventually, these measuring tools were incorporated into precise glass-overlay screens, commonly called "chart gages." The most common chart gage is the toolroom chart. It
can measure angles, radii, lengths and widths. One of the most effective ways to measure small radii--an inherently difficult measurement to make on any inspection
system--is by using a chart gage on an optical comparator. Albeit a subjective measurement, this technique can provide meaningful and reproducible results in a short time.
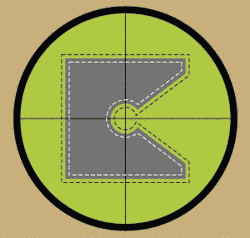
Standard chart gages, such as toolroom charts or custom chart gages with minimum and maximum tolerance zones, can be used as go/no-go gages for quick inspection, as illustrated on
page 30. In fact, using chart gages this way on an optical comparator is still one of the fastest and most cost-effective methods of measuring profile dimensions.
Nevertheless, dedicated charts are being replaced by electronically generated chart gages. During the past few years, these have evolved to the point that part features are automatically
measured in a comparator's computer-numeric-control mode by using automation software and motorized worktables. In addition, a software package capable of
comparing and fitting the collected point-data to a nominal CAD file by rotating and translating the data set can be used offline for analysis. The advantages of this "soft"
chart gage is that the subjectivity inherent to visual comparisons with a chart gage is removed; in addition, the software can return quantitative information rather than just a
simple go or no-go condition. And because the "charts" are stored on a computer's hard disk rather than in a cabinet, there's no risk of wear or breakage.
In addition to accurate chart gages, measuring by comparison requires accurate, distortion-free images across the full screen. High-quality optics and illumination
sources play critical roles in making effective measurements with this technique. Using Chart Gages for Go/No-Go Gaging
  Measurement by screen rotation. Another early measurement technique still
performed with optical comparators is rotating the screen to measure angles. Similar to measuring with chart gages, measuring angles is still quick, simple and highly effective.
Vernier scales provide angle measurements when rotating the screen ring. In recent years, digital rotary encoders have eliminated the need for vernier scales, making angle
measurements even easier. Angles are digitally displayed in 0.01-degree increments. The screen ring is rotated (as shown on page 32) so the centerlines are aligned with the
first edge, the angle display is zeroed and the screen is rotated and aligned with the second edge. The angle between the two edges is digitally displayed in the LCD window. Measurement by screen rotation. Another early measurement technique still
performed with optical comparators is rotating the screen to measure angles. Similar to measuring with chart gages, measuring angles is still quick, simple and highly effective.
Vernier scales provide angle measurements when rotating the screen ring. In recent years, digital rotary encoders have eliminated the need for vernier scales, making angle
measurements even easier. Angles are digitally displayed in 0.01-degree increments. The screen ring is rotated (as shown on page 32) so the centerlines are aligned with the
first edge, the angle display is zeroed and the screen is rotated and aligned with the second edge. The angle between the two edges is digitally displayed in the LCD window.
Screen-ring calibrations can minimize thermal effects and ensure accurate angle readings. These calibrations can be performed in seconds by rotating the screen 360
degrees and entering a compensation factor, if needed. Measurement by Screen Rotation
  Measurement by motion. Before moving worktables were incorporated into optical
comparators, special slide fixtures with accompanying chart gages were used to measure long parts that didn't fit within the field of view. Eventually, micrometer heads
were incorporated into worktables to track parts' positions as they moved. Comparators now use glass scales integrated into a geometric processor with a digital readout for making measurements. Measurement by motion. Before moving worktables were incorporated into optical
comparators, special slide fixtures with accompanying chart gages were used to measure long parts that didn't fit within the field of view. Eventually, micrometer heads
were incorporated into worktables to track parts' positions as they moved. Comparators now use glass scales integrated into a geometric processor with a digital readout for making measurements.
There are two main advantages to measuring by motion. First, because part features are measured at the screen centerline, the need for a large screen and corresponding
large system is eliminated. The more compact systems used today take up less floor space. Second, comparators can operate in CNC mode when worktables are combined
with motor drives, edge detection and automation software. This significantly increases productivity and reduces operator subjectivity.
In order to measure accurately using worktable motion, optical stability and mechanical accuracy are paramount. In addition, when measuring in CNC mode, edge
detection must be repeatable. There are many tools and techniques used to calibrate the mechanical components of optical comparators to ensure accurate measurements when
worktable motion is involved. The frequency of recalibrations required is a function of the system's mechanical stability and the working environment in which the machine is
being used. High-quality systems are typically recalibrated every six months. Types of optical systems
The simplest optical design used in comparators is appropriately called the "simple optics" design. It incorporates a light source, a magnification lens, a main reflecting
mirror and a screen. Machines with this design display images that are both upside-down and reversed.
A second setup is called the "corrected optics" design. This system uses two internal mirrors to flip the image so that it's displayed right-side-up, but it's reversed on the
horizontal axis. On systems with simple-optics and corrected-optics designs, working distance (i.e., the distance between the part and the machine's front receiving lens) decreases as
magnification increases. More sophisticated machines incorporate a relay-lens system, which provides a constant working distance at all magnifications. There is no tradeoff
between part size and magnification. A third type of optical design is the "fully corrected system," which displays images
that are both erect and unreversed. The convenience of seeing parts on-screen in the same orientation as they are seen on the worktable makes the machine easier to use,
particularly by inspectors new to optical comparators. A useful addition to these optical designs found in many modern comparators is
telecentric optics. A small opening, similar to a camera's shutter opening and called the "telecentric stop," is placed inside the optical path to block light rays that aren't parallel
to the optical path. This design increases depth of field, which in turn ensures magnification consistency across a range of focal settings. Thus, the size of the image
doesn't change, even when it is slightly out of focus. This reduces measurement variability from one inspector to another. Telecentric systems provide a flat field and a
more accurate representation of 3-D parts in relation to their 2-D drawings. Types of illumination
Illumination used to project a part's shadow is referred to as "direct projection" or "profile" illumination. Illumination sources include filament types, such as
tungsten-halogen, and arc types, such as mercury-arc. Mercury-arc sources typically are brighter and last longer than filament lamps.
Illumination systems incorporate collimator lenses that collect light from the source and project it onto the part. By projecting parallel light rays across the part, collimator
lenses can improve image quality and reduce the adverse effects of stray light rays that cause halos and blurred edges. An illustration on page 32 shows the desirable light rays
from a collimated light source compared to a light source with diverging light rays that could produce unclear images.
Collimated- vs. Diverging-Light Sources
Surface illumination is used to inspect dimensions that can't be viewed in profile
because they're on the part's surface rather than along its edge. There are two types of
surface illumination: square-on, also referred to as "coaxial" (or "bright field"), and
oblique (or "dark field"). Square-on illumination typically works better for measuring flat surfaces or blind holes, but oblique illumination is better for measuring angled
surfaces. Fully corrected telecentric systems usually use square-on sources, while simple-optics and corrected-optics systems use oblique lighting. Types of edge detection Edge detection on optical comparators reduces operator subjectivity of measurements
that otherwise involve some discretion or reliance on eyesight and experience. External types of edge detection use a wand with an imbedded photo sensor positioned directly
over the screen. Higher-end systems incorporate internal edge-detection hardware with multiple sensors. Located behind the main reflecting mirror, internal detection leaves the
main screen unobstructed and reduces the frequency of required recalibrations. Types of processing
A wide range of geometric processors and software accessories is available for use with optical comparators. Both built-in and add-on processors place measurement
functions at arm's length, enabling quick feature calculations and information storage for easy retrieval. Point data, captured either through visual inspection or by using an
automatic edge detector, are entered into the processor via a keypad. Measurement features include lengths, widths, diameters, radii, angles and intersections. Form
tolerances, including straightness, roundness and concentricity, can also be checked against nominal specifications. More powerful processors are capable of recalling
previously measured features for making constructions and measurements from stored data. Many motorized optical comparators can be configured with CNC software packages
to automate the inspection process and provide a graphical user interface to simplify programming and measurement analysis. These packages can also be interfaced with
statistical process control and custom reporting software. Final view
Optical comparators are used to measure manufactured parts in a wide range of industries around the world every day. Available with numerous features and options to
suit many applications, comparators can be used throughout a factory, including incoming inspection areas, R&D labs, machine shops, assembly and production floors,
and final inspection areas. Their versatility, range of capabilities and return on investment make comparators indispensable and integral to any quality plan. About the author Tad A. Davis is contour projector product manager for Optical Gaging Products Inc.
in Rochester, New York. He can be e-mailed at tdavis@qualitydigest.com . |