| by Kennedy Smith and Dirk Dusharme
If you’re not a hardness
tester user, you’re likely not even aware of these
tools or what they do. However, these instruments, which
measure the hardness of materials, have been around for
more than a century. They not only determine whether your
product is within specification, but they may also help
prevent potential major problems down the line.
A recent episode of the popular TV series CSI: Crime
Scene Investigation illustrates this point. During
the episode titled “Chasing the Bus,” a bus
experiences a flat tire, veers off the road and crashes.
The accident kills several passengers, leaving others with
serious injuries--far more dire results than usually associated
with a flat-tire incident. The following is an excerpt from
the episode, in which investigators in the lab use a hardness
tester to discover the real cause of the catastrophe:
Warrick: Three-quarter inch bolt. It matches
the bolt on the specs for this suspension system. The hex
head says it’s a grade eight.
(Warrick hands the bagged bolt to Grissom. He looks at
it and notices the sheared end.)
Grissom: Snapped in half?
Sara: Bolts are graded according to their
hardness. The higher the grade, the stronger the steel.
Nick: A grade-eight bolt shouldn’t
snap like a toothpick.
Grissom: Did you do a Rockwell hardness
test?
Nick: Yeah, I hit it with the Tru-Blue.
It’s not a grade eight. It’s a grade five. (Note:
Tru-Blue is a Rockwell hardness tester from United Calibration
Corp.)
Sara: The bus company was using bogus
bolts.
Grissom: Inferior bolts would cause the
suspension to give and the bus to veer off the road.
Granted, this is a worst-case dramatization of what can
happen when companies skimp on proper hardness testing.
A more likely outcome is that without proper hardness testing
of your materials, you’ll soon lose business to your
competitors who will use this time-tested metrology tool
to lure customers with better product.
So, what is a hardness tester? What’s its purpose
on the shop floor? And what types of hardness testers are
available?
“All hardness testers have the same thing in common,”
explains Dick Ellis of David Ellis Co. “It’s
a known load to a known penetrator. That’s it. That’s
the whole story right there.” To elaborate, hardness
testers are typically used to measure the resistance a piece
of material will have against a set force. Often used to
measure the hardness of heat-treated materials, including
steel, they’re also used in testing plastics, rubber
and other nonheat-treated substances.
According to Ellis, around 50 percent of the hardness testers
used today were built before the 1960s. “There were
some new developments when the computer came out, but a
hardness tester is just like a micrometer or an optical
comparator--its basic principles stay the same,” says
Ellis. “Think of it this way: A screwdriver works
just fine; you don’t need to add a graphical display
and lasers to it. It’s the same with hardness testers.”
There are a number of hardness testers available on the
market today. Which one to choose depends on your specific
needs.
According to Mark Antonik, hardness testing specialist
at Sun-Tec Corp., the Brinell hardness tester first appeared
on the market sometime near 1900.
Scott Robinson, a technician at The L.S. Starrett Co.,
elaborates. “Basically, a Brinell tester uses a round
ball indenter to press into a piece of metal with a known
force. That force will cause a dimple in the part. The harder
the material, the smaller the dimple.” Once the dimple
is established, it’s measured, and that measurement
is assigned a certain value, as illustrated.
The problem with Brinell testers, however, is that the
round ball indenter doesn’t necessarily make a clean,
perfectly round indentation, making it difficult to measure
exactly how hard the material really is.
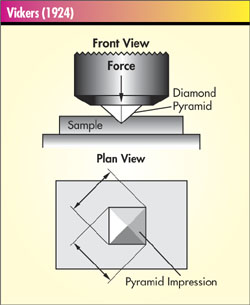
Sometime around 1924, the Vickers hardness tester was developed.
The difference between a Brinell and a Vickers hardness
tester is the type of indenter used. Where Brinell uses
a round ball indenter to press materials, Vickers utilizes
a square or diamond-shaped indenter. It’s the same
basic principle as the Brinell, but the user has a device
to measure more defined indentations rather than Brinell’s
harder-to-determine round indentation. (See illustration.)
In the United States, Rockwell is the hardness testing
method of choice. Of course, there are exceptions, and Brinell
and Vickers testers are abundant domestically. However,
other countries, such as Japan and Germany, turn to Vickers
and Brinell testing more often, according to Ellis.
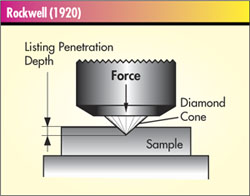
The Rockwell hardness testing method was developed during
World War II and uses a cone-shaped diamond indenter to
penetrate material.
“Basically, developers take a known penetrator--the
diamond point--and press it into a piece of material,”
explains Robinson. “Then, they can measure the depth
of indent. It’s a quicker system, and that’s
what the United States settled on: the penetration system,
rather than measuring across the distance on the material.”
(See illustration)
To understand exactly how these tools correctly determine
hardness, it’s important to learn about one of their
most vital accessories: the load cell.
Load cells measure the amount of force being applied to
the indenter, ensuring that the same amount of force will
be applied from one measurement to the next. Before load
cell technology, hardness testers used a dead weight system
in which frictional and mechanical losses would cause variations
in the amount of force from measurement to measurement.
This would negatively affect the user’s gage R&R.
In other words, with load cells, frictional and mechanical
losses are continuously compensated for; in dead weight
systems, they’re not.
“When a force is applied to the body of the cell,
a sensor (referred to as the strain gage) undergoes a change
in resistance proportional to the applied force,”
explains Phil Eusebi of United Calibration Corp. That change
in resistance can be translated into a numerical value that
can be viewed by an electronic readout system.
“The load cell has replaced the use of dead weights,
levers and pivoting points. The United Tru-Blue II Rockwell
tester doesn’t require leveling, cleaning and oiling
of its measurement system as does the dead weight system.
The tester’s load cell is calibrated using a proprietary
computerized calibration system and a primary standard load
cell that has been certified in compliance to a national
standard.”
In the plastics and rubber industries, the Durometer method
is often used. Evolving from a hand-held measurement device,
there are now more accurate benchtop models that can read
to a tenth of a point with good repeatability, according
to Newage Testing Instruments Inc. The Durometer method
applies a predetermined test force to a spherical- or conical-shaped
indenter. The depth of indentation is translated into hardness
value by means of a dial gage. “Micro” scales
are also available for thinner and more narrow specimens.
The International Rubber Hardness Degrees method was developed
in Europe but has become more common in the United States.
IRHD provides repeatable results on rubber parts of any
shape or size--coming in handy for measuring the hardness
of rubber O-rings.
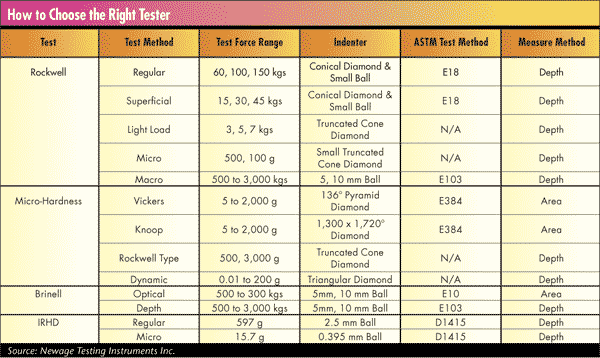
According to Newage, there are several questions that need
answering before choosing the right tester. These include:
 Is there a hardness scale specified (Rockwell, Vickers,
Brinell, etc.)?
Is there a hardness scale specified (Rockwell, Vickers,
Brinell, etc.)?
What is the material being tested, and is it suitable for
a particular test?
How large is the part?
What volume of testing has to be done?
How accurate do the results need to be?
What is your budget?
What problems have occurred in the past?
For a more in-depth look at how to choose the right tester
for your application, see the chart below.
Newage offers some general tips to help your hardness testing
experience go smoothly. Among these considerations are:
Large parts. Parts that aren’t easily supported
on an anvil should be clamped into place or properly supported.
Small parts. The smaller the part, the lighter
the load should be. Meet the minimum thickness requirements
and properly space the indentations away from edges.
Cylindrical testing. A correction to a test result
is needed when testing on small-diameter cylindrical shapes
due to a difference between axial and radial material flow.
Space indentations. Maintain a spacing equal to
2.5 times the indentation’s diameter from an edge
or another indentation.
Thickness. Maintain material thickness at least
10 times the indentation depth. n Scale conversions. Sometimes
it’s necessary to test on one scale and report on
another. Conversions have been established by the American
Society for Testing and Materials, but unless an actual
correlation has been completed by testing on different scales,
established conversions may not provide reliable information.
Gage R&R studies. In hardness testing, there
are variables that preclude using standard gage R&R
procedures with test pieces. Material variation and the
inability to retest the same area on depth measuring are
two significant factors.
A hardness test is only sound if it compares accurately
to others’ tests. This is where ASTM and the National
Institute of Standards and Technology come into play. Hardness
standards have been established and maintained by ASTM,
including ASTM E18, E384, E10, E110 and others. (Visit the
ASTM Web site at www.astm.org.)
NIST’s role in hardness testing began in the early
1990s, when representatives became active in ASTM’s
Indentation Hardness Test Task Groups. “Before the
NIST program, there was variance in hardness levels among
all the different manufacturers around the world,”
notes Sun-Tec’s Antonik. “Now we line up with
international standards.” NIST helped standardize
test blocks and has since facilitated commercial test block
manufacturers to make their test blocks NIST-traceable.
This article has provided a basic overview of the purpose
and different types of hardness testers available on the
market. Depending on the hardness tester you need, you could
be looking at spending anywhere from $5,000 to more than
$50,000. To find out specific details about the different
testers available, visit the Web sites listed on page 26.
Kennedy Smith is Quality Digest’s associate
editor. Dirk Dusharme is Quality Digest’s
technology editor.
|


 Choosing
the right tester
Choosing
the right tester