How To Test For Thermal Errors Every quality technician knows by now that temperature variations can cause errors in precision dimensional measurements. Some choose to ignore this phenomenon, some claim they have no time to do anything about it, and others take action.
by Paul Sagar The fact is that in some situations temperature variations are relevant, while in others they are not yet. In the latter case, this may just be a matter of time because tolerances continually get tighter. "Surveys show that dimensional tolerances (e.g., diameters, distances, etc.) as a main rule are reduced by an average factor of 10 over 50 years, and this law of reduction can be traced back 200 years," notes ISO Technical Committee 213. "It will probably not change on the contrary. The present and future production and process methods can control these tolerances as well as the required measurements during and after production that are necessary for obtaining the smaller and smaller tolerances." 1 As a consequence, specifications for dimensional tolerances continue to tighten, sometimes to the point where they can be held only if temperature is taken into consideration. Temperature effects are subtle and not obvious to the naked eye. However, a simple procedure can help you determine if they should concern you. To begin with, though, keep in mind that the results obtained in a gage R&R study can differ from the performance of the tested gage on the shop floor. Gage R&R studies usually are performed over short periods of time, under relatively well-controlled thermal conditions. On the shop floor, however, precision gages will measure parts over much longer periods and under varying temperatures. Procedure To observe the effects of temperature on your precision measurement system, you will need:  A thermometer A thermometer
 One representative work piece (the "test part") measured by your gage One representative work piece (the "test part") measured by your gage
 Occasional access to the gage for a week or two Occasional access to the gage for a week or two
Step 1 Position the thermometer safely and securely near the gage. Step 2 In the same manner you would measure any other part, measure the test part in the gage, three or four times every day at intervals of two or three hours, for a period of a week or two. Each time you measure the part, record:  Thermometer reading Thermometer reading
 Dimension Dimension
 Time and date of measurement Time and date of measurement
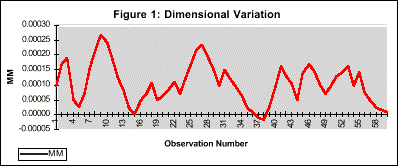
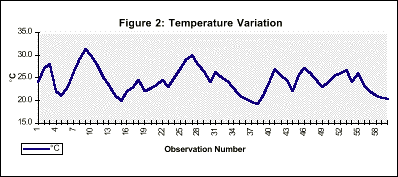
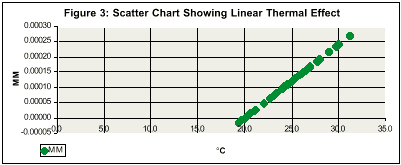
Step 3 Upon completing 30 to 60 recorded observations, tabulate your data and compile graphs, as in figures 1 and 2, which show dimensional measurements of the test part and respective temperatures over the test period. Look for correlations between dimensional and thermal variations. Where a single temperature measurement series (e.g., work piece temperature only) exhibits a direct linear effect on dimensions, a scatter chart similar to Figure 3 may reveal that relationship. 


Step 4 If you see from these data that temperature affects your measurements, the final step is to quantify the error. Simply determine the range of dimensional variation. If you work with tightly toleranced dimensions, remember that it is generally considered good practice to maintain gage R&R at 10 percent or less. Compare the amount of observed dimensional variation in your test against the tolerance on the test part. If you conclude that temperature produces an unacceptable effect on your measurement system, take steps to address the problem. Simple solutions exist today; temperature compensation systems are available at reasonable prices. In some cases, these systems can substantially improve your process capability and overall quality, saving you the expense of installing sophisticated air conditioning or coolant chillers. Note: This test records only ambient temperature. For advanced testing, a touch probe can be used to gather additional temperature information such as temperatures of test part, gage fixture and, in some cases where relevant, setting master. Reference 1. "The Challenge of ISO/TC 213." International Organization for Standardization. ISO Technical Committee 213: Dimensional and Geometrical Product Specifications and Verification. www.ds.dk/isotc213/challenge.htm About the author Paul Sagar is president of Albion Devices Inc., a Southern California-based company specializing in temperature compensation of precision in-process and post-process measurement and positioning systems. Telephone (619) 792-9585, fax (619) 792-9644, e-mail pbsagar@juno.com. |


