|
|
||||||||||||||||||
|
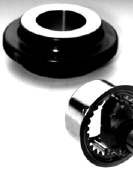
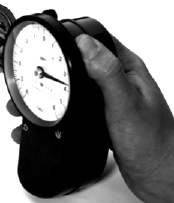
Here's the nightmare: You arrive at work to find your best customer has just returned $10,000 worth of precision ceramic parts. They are all neatly boxed and sitting on the inspection room floor with a nasty note saying that they are all out of tolerance. You stand to lose one of your best contracts, not to mention your job, unless you get to the bottom of the problem right away. So you immediately go to your tool crib and remove your precision digital micrometer from its padded box where it lay with its anvils neatly closed. First, you check the calibration sticker. The micrometer has a six-month calibration schedule and was calibrated five months ago. No problem there. You check the absolute zero setting on the micrometer. It reads 0.00000". Exactly where you set it when you put a fresh battery in last month. So the micrometer should be OK. The micrometer and the parts have been at the same temperature for several hours, so you should be OK there, too. It's time to check the parts. You remeasure every one of them. They're in spec. All of them. The customer must be wrong. Maybe. Or, it could be that the micrometer has been misused and is no longer accurate. Can you spot the gage-use errors in the above story? If not, read on--there are at least three opportunities for misuse and any or all of the errors could be responsible for causing the micrometer to give inaccurate readings. This article points out common gage-use errors. To gather our list of gage faux pas, we spent the day with Craig Howell at CPM Labs, one of Sacramento, California's, leading gage calibration laboratories. Howell has 15 years' experience in gage calibration--eight years as a metrologist for AeroJet and seven years as president of CPM Labs. If there is a way to abuse a gage, Howell has seen it. He estimates that up to 20 percent of the gages he receives are out of tolerance. Of those, perhaps one-quarter are that way due to improper use. Abusing micrometers and calipers What causes the most damage to micrometers and calipers? "Dirt and grime," Howell quickly replies. "If your tool is dirty, it's sanding the measuring surfaces down." Part of the accuracy of calipers and micrometers is the flatness and parallelism of the two surfaces that come into contact with the part. As these surfaces wear, the accuracy diminishes. If the surfaces have any grime, a small amount of wear will occur as soon as the surfaces meet the part to be measured. A precision micrometer has an accuracy of ±0.0001", and a caliper has ±0.001". It doesn't take much wear to eat up those tolerances. Howell has seen micrometers with as much as 0.001" wear on the measuring surfaces--10 times the gage's accuracy tolerance. While worn micrometer surfaces can be repaired and the micrometer recalibrated, calipers present a more difficult problem. "Calipers are almost impossible to bring back into spec when the jaws wear because they have three measurement surfaces, those for inside diameter, outside diameter and depth," explains Howell. "You can't work on one without affecting the other." Another common mistake is storing calipers with the jaws closed or micrometers with the spindle closed on the anvil. If there is any dirt on the measurement surfaces, closing the gage all the way grinds the dirt in between the two surfaces. Additionally, particularly with a micrometer, if the gage is bumped while closed, it causes the anvil and spindle to jam together, possibly damaging the lead screw and introducing error. "I've received micrometers that have been wrenched past zero," notes Howell. In the past few years, the new digital micrometers have introduced several problems. First, some users may inadvertently be shortening their digital micrometer's battery life. Many digital micrometers have a display that turns off automatically when not in use. However, a small movement of the head is enough to activate the display. So, if the tool is sitting in a locker and the locker is opened to remove another tool, the vibration may cause the display to turn on. This, of course, shortens the battery's life. Solution: Use the gage's locking mechanism when storing it. Batteries do eventually go dead, however, and need to be changed. Here is where the next problem arises. When the battery is changed, the micrometer loses its absolute zero setting and must be reset. "No problem," you say. Simply close the anvil and spindle all the way, and reset the absolute zero to 0.00000". Although this may work on a brand-new or very well-maintained micrometer, you may actually introduce error on a calibrated micro- meter where the closed reading is not 0.00000", a common occurrence. The only way to accurately reset the micro- meter is to refer to the calibration data from the last calibration report. Assuming, of course, that your calibration lab provides the actual readings. Not all do. If you do have the report, choose any measurement point from the report where the actual test readings were nominal, i.e., actual reading equals expected reading (zero error). Reset your micrometer using gage blocks of that same dimension. If your calibration lab didn't provide actual readings, your next best choice is to use a gage block in your micrometer's midrange and set the micrometer to that dimension. Obviously this procedure doesn't apply to micrometers that only have a zero reset. Remember that both your gage and the part to be measured should be kept at the same temperature for at least four hours before measuring to cancel out any errors due to expansion. Further, be sure you understand the expansion coefficients of the material you are measuring if it isn't steel. Ceramic, for instance, has a different coefficient of expansion than your steel micrometer. Damaging dial indicators The dial indicator is probably the most ubiquitous of gage tools and arguably one of the easiest to damage. Consisting of a very small precision spring attached to either a lever or plunger mechanism, the tool is susceptible to a number of misuses. What's the No. 1 misuse? "Dirt and grime," groans Howell. He opens his gage "Hall of Shame" drawer and removes a dial test indicator. The inside of the faceplate is stained yellow. This lever-actuated gage was used as part of a machining operation and is full of dried cutting fluid. Obviously, a sealed gage should have been used. Not only was the gage scrapped, but also any measurements made with the gage would have been suspect. Assuming the gage is not immersed in cutting fluid, the other most common misuse is slamming the needle. Howell pulls out a little plastic Baggie containing what looks like a small piece of a Brillo scouring pad. It turns out to have once been a precision spring from a dial test indicator. "This is what happens when you smack the lever on a lever-actuated dial indicator," he remarks. Although lever-actuated dial indicators have a release mechanism that allows the lever to be extended beyond the measuring range, this does not protect from damage to the mechanism if this over-range movement is done too quickly, e.g., jamming the gage lever into contact with the piece to be measured. The same problem can occur if you use a dial gage with too short a range for the measurement job at hand. For instance, measuring runout on a lathe-mounted part. If the runout is larger than the range of the gage and you rotate the part too quickly, it will slam the dial and possibly damage the gage. Plunger-actuated gages don't have the same protection against overtravel as do lever-actuated gages, making them even more sensitive to damage. Too much overtravel on the plunger, no matter how slowly it is done, will damage the gage. The solution: When measuring with a dial gage, be sure to approach the part to be measured slowly. And be sure to use a gage that has a measurement range larger than the range you need to measure. A note on proper gage accuracy and usage: Gage labs often receive calls from customers who have just received their dial gage back from calibration and complain that the gage is not accurate, says Howell. "People don't realize how far off a gage can be and still be in tolerance," he explains. "I have people call up and complain that a gage is off by half a division. The gage accuracy is only one division." Having an accuracy of one division means that a gage that reads 0.0021" on a 0.0020" step is still within the gage's calibration tolerance. In addition, the plus or minus one division tolerance is valid only for the first two-and-one-third rotations of a multiturn gage. From two-and-one-third rotations to 10 rotations, the spec may be two divisions. From 10 rotations to 20 rotations, the tolerance may be four divisions, and increase even more above that. Usage may also be an issue. Remember that the springs on a dial gage must be preloaded. Measuring with an unloaded dial gage will often give inaccurate results. Misusing torque wrenches Howell pulls out a 30-150 ft./lb. click-type torque wrench that he has just finished calibrating. It looks shiny and new. "This wrench was rusty and set to the midtorque range when we received it," Howell points out. "We had to totally disassemble it and overhaul the movement." Although allowing the wrench to get rusty is an obvious misuse, the fact that the wrench was received set in the midtorque range is a not-so-obvious error. Here's the problem: A click-type torque wrench is basically a tube with a spring in it. The spring puts a calibrated amount of pressure on a ratchet mechanism that releases when a preset amount of torque is applied. Compressing the spring sets the amount of torque. Storing the wrench with a torque setting means that you are leaving the spring in a compressed state, which eventually causes the spring to lose some of its elasticity. The result is very obvious when you look at the torque readings Howell made before overhauling the wrench. All torque readings were low, about 10 percent low at low torques, and improved as he moved toward higher torques. The lesson: After using a click-type torque wrench, clean it off and return the torque setting to zero. This rule actually applies to any spring-actuated device. Don't store a gage with the spring compressed. The bottom line: A wrench that normally would have cost $32.50 to calibrate now cost the customer $65. The cost would have been substantially higher had it been necessary to replace the spring. Disrespecting surface plates That huge piece of granite sitting in your inspection room is one of your most critical measurement tools because it is the reference upon which many of your measurements are based. It must be treated with the same respect you'd give any other precision tool. And the fact that it weighs 800 lbs. doesn't mean that its accuracy is cast in, well, stone. In order for surface plates to maintain their accuracy, they must be level and resting on a three-point support designed for that purpose. These two requirements are necessary for proper weight distribution. Granite is elastic, Howell points out, and even a properly maintained surface plate sags over time. Improper installation causes the plate to sag more than can be compensated for during its yearly calibration. Also, surface plates are not tables to set things on, cautions Howell. "I've noticed that the most wear on surface plates is always on the edge toward the door," he explains. "That's because people come through the door and throw whatever they have in their hands onto the table." The result is that one end of the table receives excessive wear. Solution: Set your stuff on your desk, not the surface plate. And, when placing parts or test stands on the plate, place them gently. Also, certain ends of the table tend to receive more work than others, which is probably unavoidable. If possible, rotate the table periodically so that wear is distributed evenly, suggests Howell. Procedural misuse Up to this point we've discussed gage misuse. Another misuse comes into play with companies that are trying to save on calibration costs by extending the time between equipment calibrations. Calibration intervals are set so that a gage receiving average use will still be in tolerance when it comes in for calibration. A well-maintained and properly scheduled gage will not be out of tolerance at calibration time. In order to cut costs, some companies may incrementally extend calibration intervals on a gage until the gage fails calibration, i.e., six months, one year, 18 months, etc. Once the gage fails, they subtract one interval and assume they have arrived at the maximum length of time that gage can be used before really needing calibration. The idea may sound good and, in some cases, may even work. But treading that close to the tool's calibration life is courting disaster. This is particularly true if a company's quality system calls for product recall if the inspection tools are found to be more than a certain percentage out of tolerance at calibration time. The cost of product recall far outweighs the cost of timely calibration. On the other hand, the gage manu-facturer's recommended calibration schedule may not be good enough for your application. Sometimes, even a well-maintained gage will wear out quickly in a harsh environment. One of Howell's customers, a ceramic parts manufacturer, learned that their parts were so abrasive that they had to have their micrometers calibrated monthly, rather than the recommended biannual basis. Remember that the quality of your product is only as good as the tools that test it and the procedures that govern the testing. When you are talking about dimensions of ten-thousandths or ten-millionths of an inch, it is critical that the measurement tools be properly cared for and calibration schedules adhered to. Properly maintained gages will ensure that you don't ship bad parts or reject good ones. The bottom line is it's cheaper to treat your gages with care than it is to lose a customer. About the author Dirk Dusharme is Quality Digest's technology editor. Thanks to Craig Howell at CPM Labs for opening his doors to us and to Joe Ritts of Moore Measurement Solutions for reviewing this article. |
| [QD Online] [Audits] [Gages] [QMS] [Standards] [Doc Control] [Juran] |
|
|
|